Step by Step Tutorial: Learn How to Cut Out Felt
This post contains affiliate links, which means I may earn a small commission at no additional cost to you if you click through the link and make a purchase. For more information, click here.
I love being crafty with felt! It does not fray once cut, and it comes in a great variety of colors. It is fun to use for crafty projects, quiet books, finger puppets, and many others. And all these adorable felt crafts wouldn’t exist without some felt cutting. Thus, learn how to cut out perfect felt shapes, felt numbers, or letters in 6 different ways. Choose among cutting felt using tape, freezer paper, pins, fusible interfacing, freehand, and a marker. Each method has its pros and cons, so read further and choose your best way to cut felt.
I used freezer paper to cut felt when I started working with felt. Then I felt it took too much time, and I didn’t have space to use iron at all times. I switched to using tape. I cut small, tiny, intricate cuts with tape. Share your experience in the comments to help others.
Happy felt crafting!
How to Cut Felt: Basics and Tools
You can craft felt projects with different types of felt. They primarily differ in the kind of fiber they are made of and fiber's density. This results in different felt qualities and how easy it is to cut it. Learn all about types of felt in the sewing with felt post. When cutting felt, it's easier to cut stiff felt as compared to traditional soft felt. Stiff felt properties make its cutting similar to the one of cardboard paper. Read further to learn how to cut crisp felt edges with soft felt.
When it comes to scissors, I recommend having two different sizes of scissors. The best small scissors to cut felt are those with pointy ends (Fiskars Micro-tip or KAI 5 1/2 inch embroidery scissors), making cutting every little design easier. Then you should have large fabric scissors (Fiskars 9 inch Razor Edge or KAI 8 inch) for larger felt cut outs which are much quicker than using smaller scissors. Both scissors must be sharp. For decorative cuts, choose pinking shears. It takes some practice to cut with them, but once mastered, you get beautiful decorative edges. Fabric and dressmaking pinking shears (Fiskars Softgrip Pinking Scissor) are meant to create seams that don't fray on garments and, therefore, work well with felt. For a deep dive into the secrets of felt scissors, read the post on the best scissors to cut felt.
For cutting felt squares, rectangles, or any straight lines, consider using rotary cutter, a non-slip quilter's ruler, and a cutting mat, especially if you already have them at home. I would cut pages for Quiet books, memory game base pieces, the felt crown base piece with the rotary cutter. If you are skillful with the rotary cutter, you can even cut curves.
Next on the list of tools that can cut felt are cutting machines. There are two main types of die cutting machines for personal use: manual and digital ones. While a manual die-cut machine (for example Sizzix Big Shot) uses cranking level and steel dies to cut the material, the digital die-cut machine (for example Cricut Maker) works with a sharp blade (rotary blade) and software file. If you consider buying the die cut machine, learn more in the best die cutting machine for felt guide.
Related posts to help you with your next felt craft project:
For more helpful tips on how to work with felt visit the section Sewing Tips and Tricks.


Now let’s take a look at the different techniques of cutting felt with scissors. The best scissors for felt are sharp scissors with pointy ends.
Here are 6 techniques on how to cut felt:
The trace and cut technique to cut felt
This technique requires tracing the shape with some pen that marks on felt (for example, erasable fabric pen, fabric markers, pen, or even pencil) and then cutting felt pattern shapes out. It is simple and rather fast. The disadvantage is that it might leave marks on the felt (if you use a shape, you cannot turn around). Also, it might not be as precise since it is challenging to match the pattern exactly. This imprecision will matter only in felt pieces, where the smallest inaccuracy counts. For example, I have once cut out rainbow color shapes for the Quiet Book with this technique. When I placed them together, I discovered they didn’t align.
This little tip helps you to know the tools for marking on felt:
pencil or pen on a light felt
fabric self-erasing marker, if I want to make sure that the line is not visible in my finished project
tailor’s chalk for a dark felt
STEPS How to cut felt using a marker:
Print the template on a paper
Cut the traced template precisely on the lines
Trace the template onto the right side of felt with a fabric marker
Cut out the felt shape just inside the line you traced
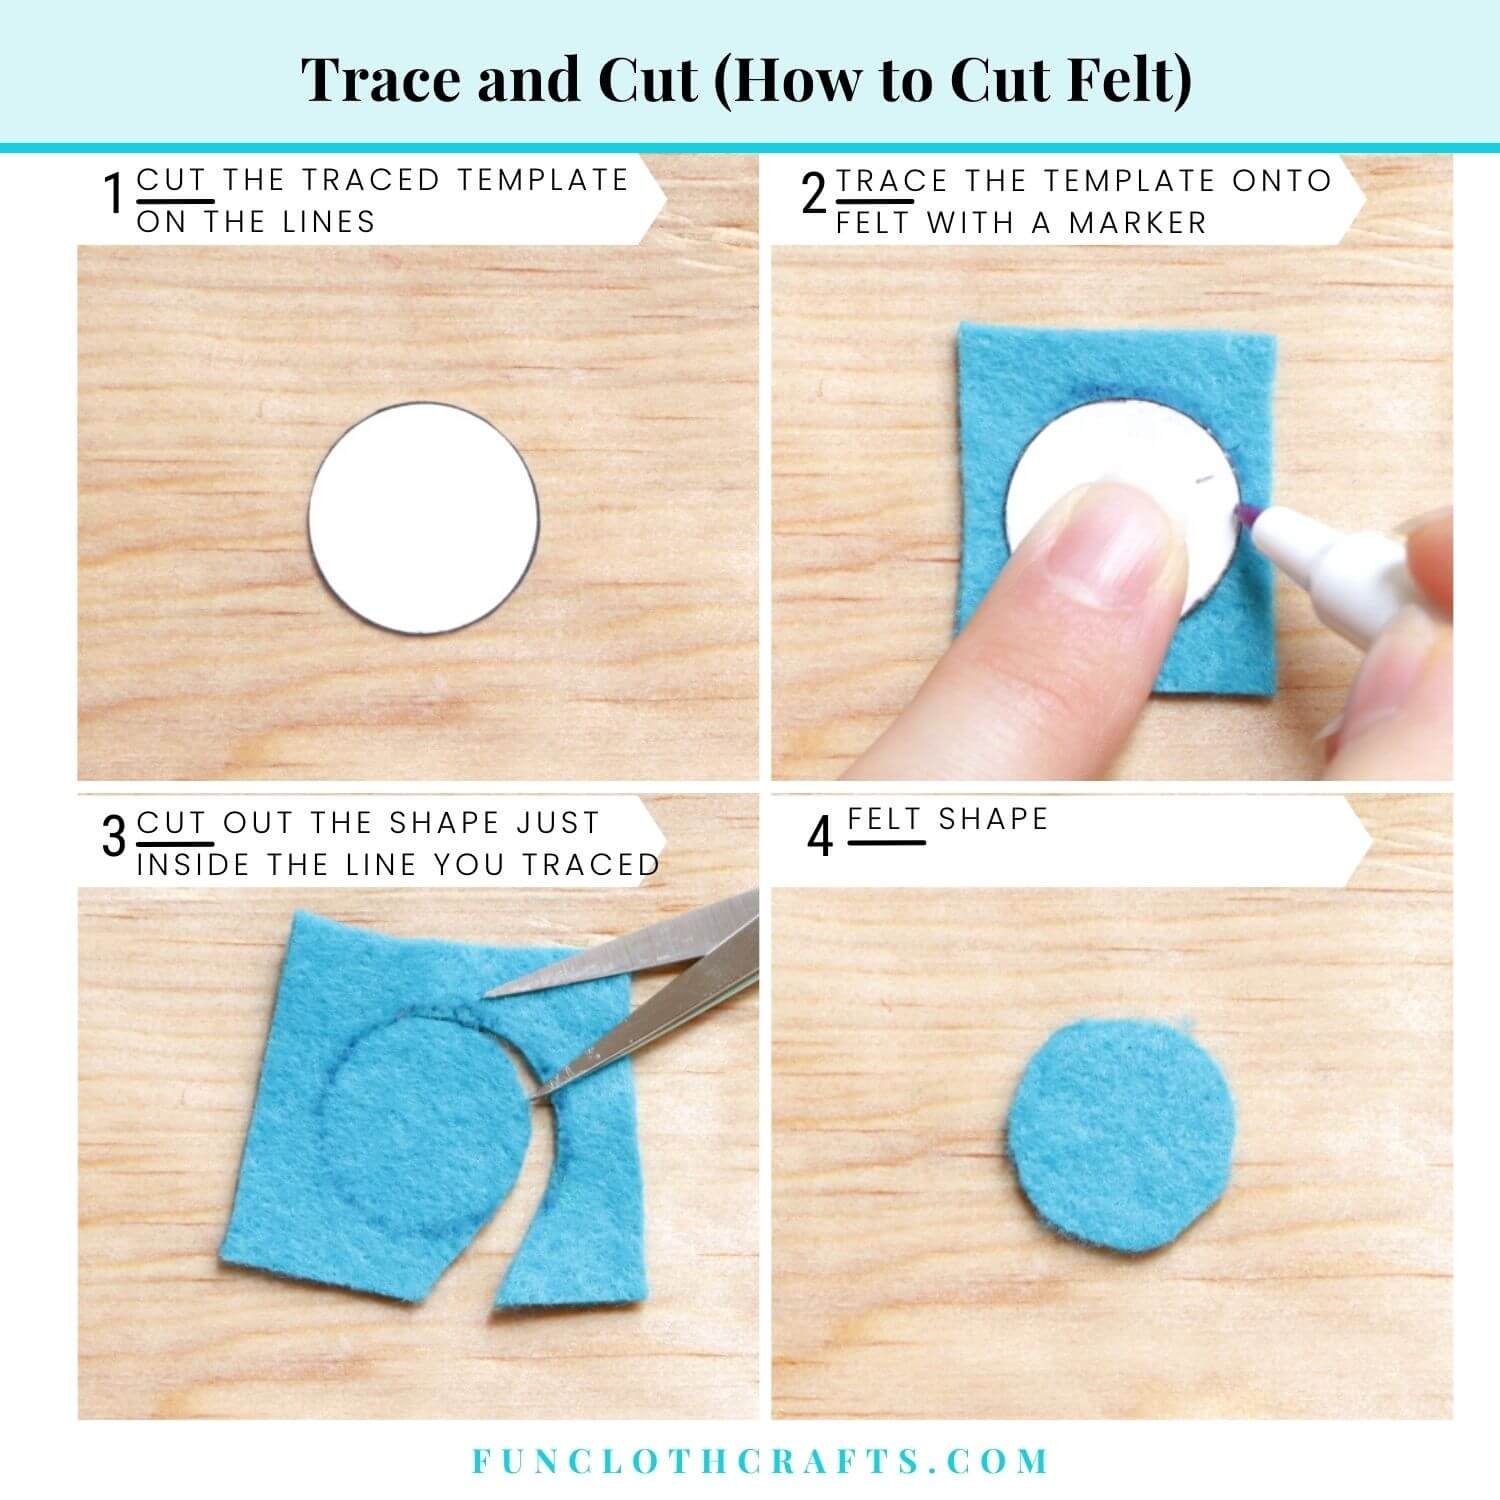
How to Cut Felt - Technique Trace and Cut
The pinning technique to cut felt
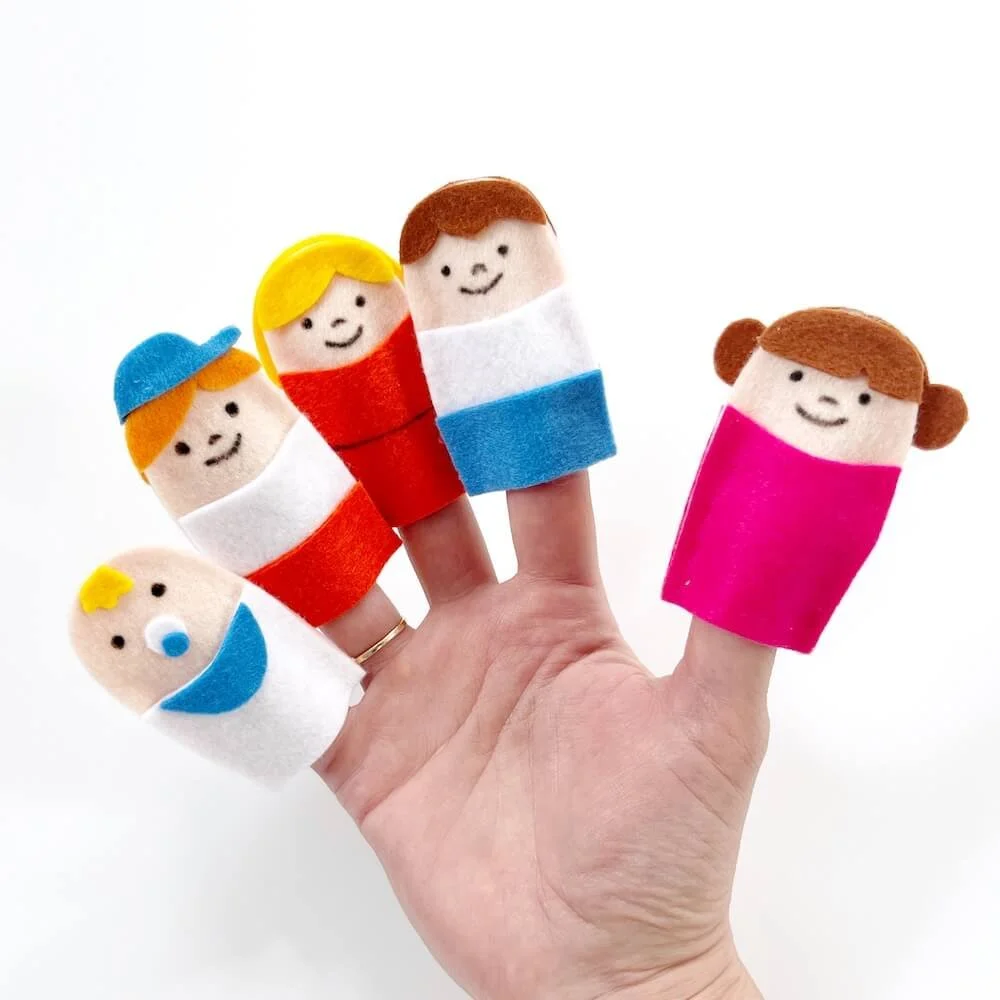
The traditional pinning technique works excellently for cutting medium-sized straight-line felt shapes. For this, the pin holds the template well in place and is easy to cut. Also, I would recommend this technique if absolute precision is not needed. The advantage is that it is fast, and you do not need any special tools. The disadvantage is that you might lose precision with more complicated felt shapes. Honestly, I used this felt cutting method at the beginning of my felt crafting journey (with the first finger puppets) but now I prefer to avoid it. This technique makes it difficult to get the detailed cuts right, as the paper pattern cannot be laid entirely flat using pins.
STEPS How to cut felt using pins:
Print the template on paper
Cut around the traced template of the paper pattern, leaving some space (not exactly on the lines)
Pin the felt shape onto the right side of felt
Cut out the felt shape on the marks and remove the pin and paper.
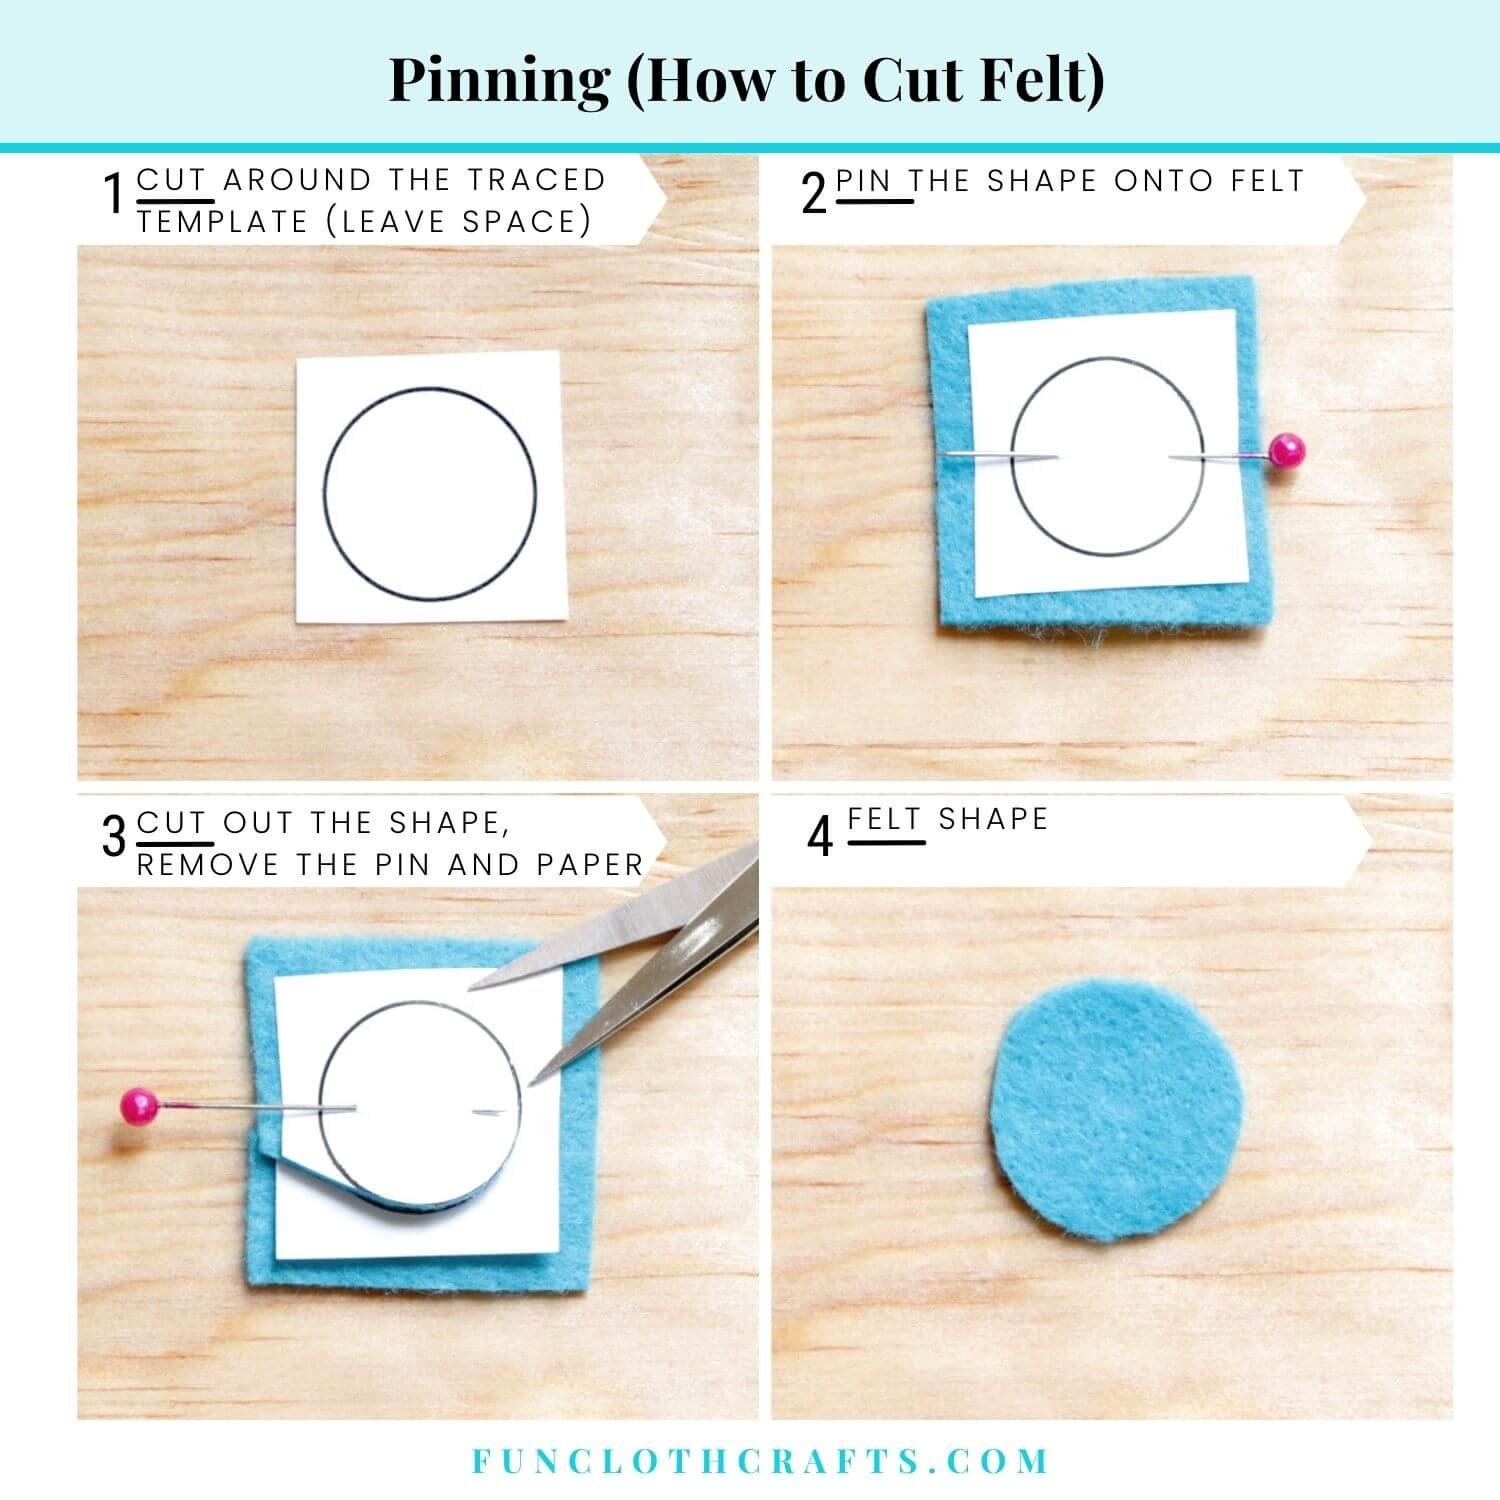
How to Cut Felt - Technique Pinning
The taping technique to cut felt
I see the taping technique as the next level of the pinning technique when cutting felt. It requires transparent tape (scotch tape) to hold the pattern in place. The cut felt shapes are more precise than using pins. It can be useful when cutting circles from felt or more complicated pattern pieces. From my experience, just be careful towards the end of cutting as the template might slip if it is not held well in place.
TIP: Press tape lightly onto felt as it sticks easily. If pressed too hard, it can stretch felt, when the tape’s residue is taken off. If you prefer, test the tape on a piece of felt before you start.
STEPS How to cut felt using tape:
Print the template on paper
Cut around the traced template, leaving some space (not exactly on the lines)
Tape the pattern piece onto the right side of felt with scotch tape
Cut out the felt shape and remove the paper with tape
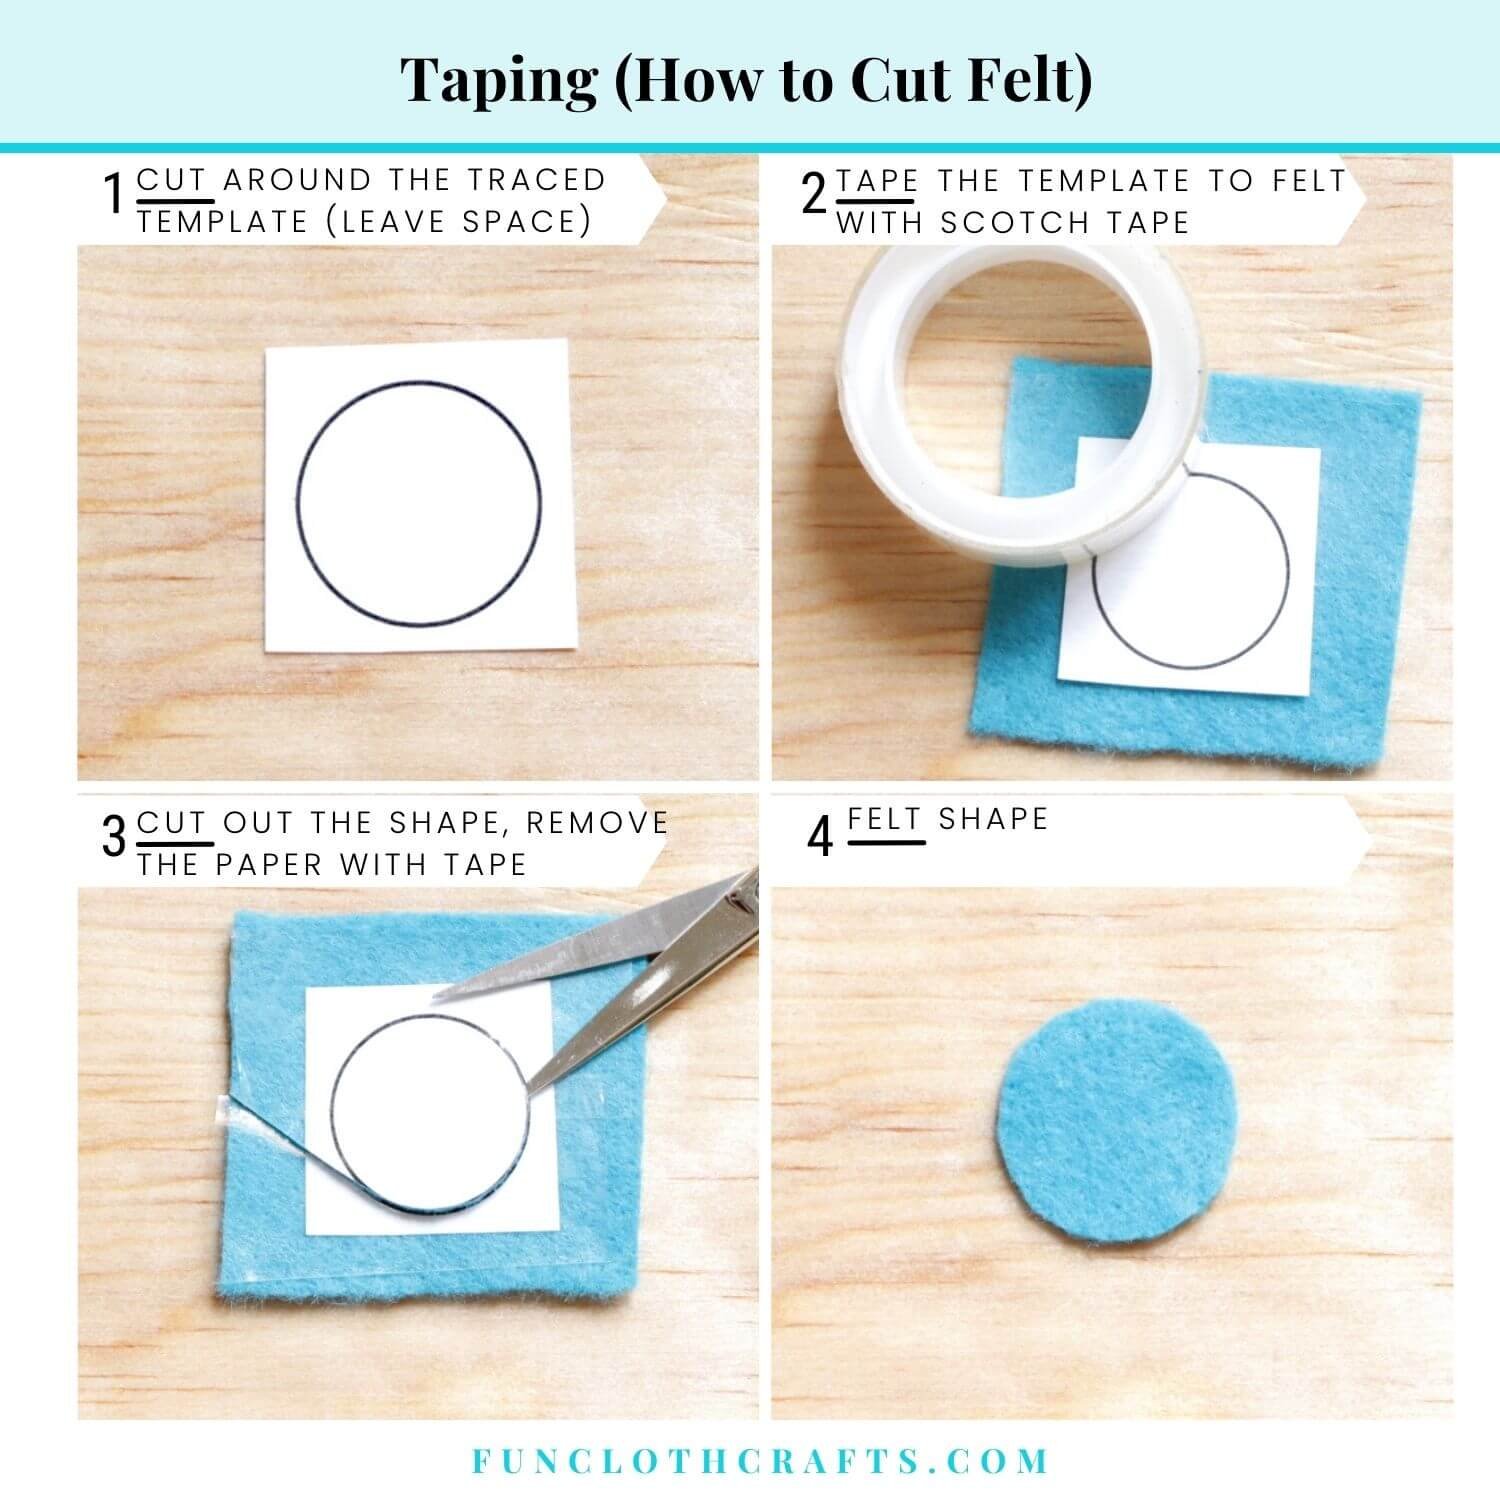
How to Cut Felt - Taping Technique
The freezer paper technique to cut felt
The freezer paper method is the most precise one but also the most laborious one, as it requires the use of iron. It's excellent for intricate designs and gives you the best results. The additional tools needed are freezer paper and an iron. Freezer paper is a special kitchen paper with a coating on one side (not to be confused with wax paper or parchment paper). Freezer paper can be ironed onto felt, making it ideal for cutting felt with precision.
TIP: You can often reuse freezer paper when using it for sewing or crafts, as long as enough wax is left on freezer paper.
TIP: If you can, try to purchase a quilter’s freezer sheet or an A4 cut Prym Freezer Paper, as you can print the template directly onto the sheet (paper side) with your printer. I like this feature.
TIP: I prefer to use old piece of shirt when ironing freezer paper. I ironed freezer paper with the shiny side up (waxy side) and it stuck to the iron.
You can read more about freezer paper for crafts in the article What is Freezer Paper from Treasurie.
STEPS How to cut felt using freezer paper:
Using a pencil, trace the template on the freezer paper with the matte side of the freezer paper up or print it out using the quilter’s freezer sheet (print on the matte side, not the shiny side)
Cut around the traced template, leaving some space (not exactly on the lines)
Iron (strength between 1 and 2 – low to medium, medium if you use a cloth over the freezer paper) the freezer paper onto the right side of felt. Caution: The bright part needs to face the felt; otherwise, you might damage your iron!
Cut out the felt shape on the pattern lines and peel off the freezer paper.
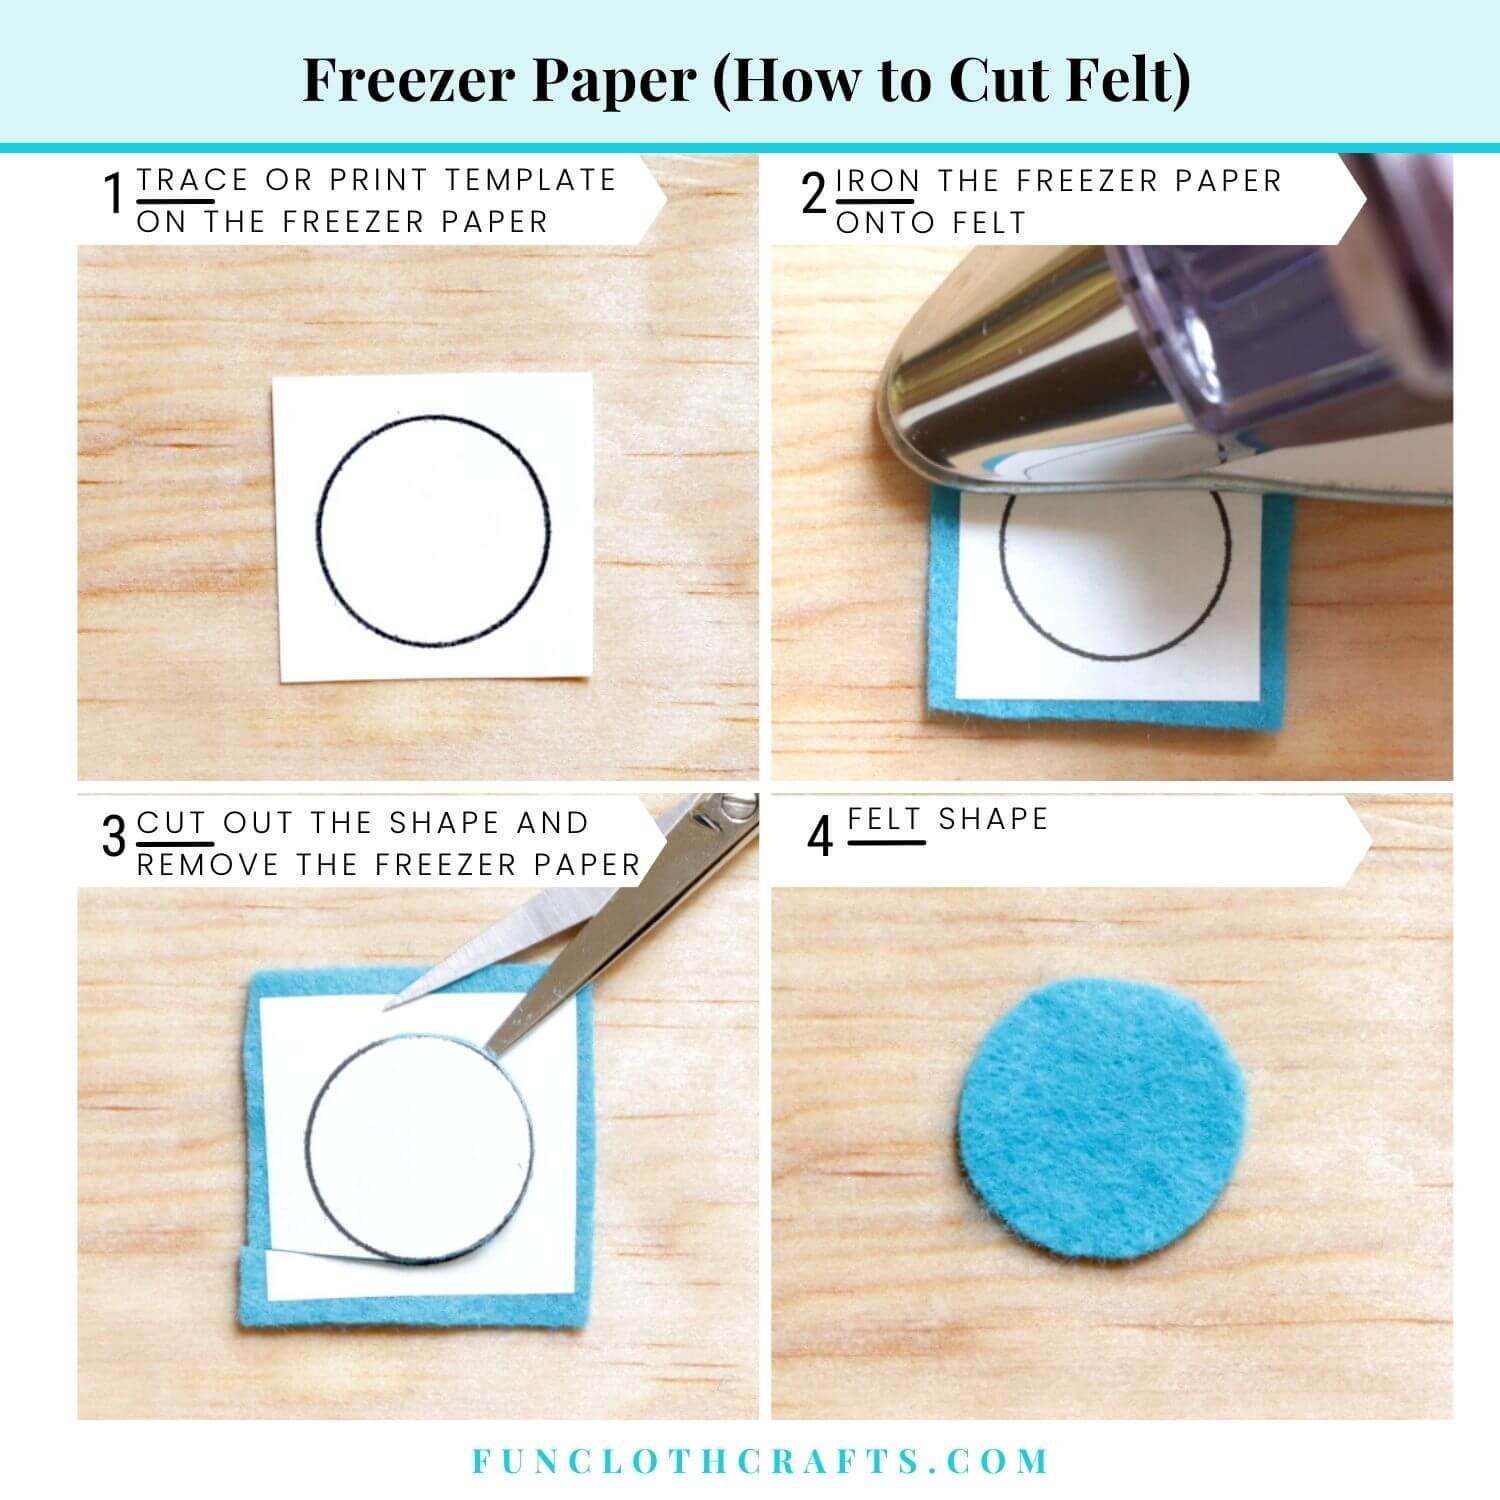
How to cut felt - Freezer Paper Technique (popular among crafters)
The fusible interfacing technique to cut felt
A technique that is precise but calls for fusible interfacing and an iron. Bear in mind that the interfacing remains on the cut felt shape; therefore, the design should be mirrored and attached to the wrong side of felt. It may be advantageous if your shape requires interfacing to give it more strength so that it lasts longer and does not stretch out. For example, I would use this technique if I want the felt shape to be more sturdy and not stretch out, such as a pocket.
TIP: Try the interfacing on a small piece of felt first.
STEPS How to cut felt using fusible interfacing:
Trace the pattern using some marker on the fusible interfacing with the adhesive side up.
Cut around the traced pattern, leaving some space (not exactly on the lines)
Iron (strength 2 – medium) interfacing on the wrong side of the felt. Caution: The adhesive part needs to face the felt!
Cut out the felt shape.
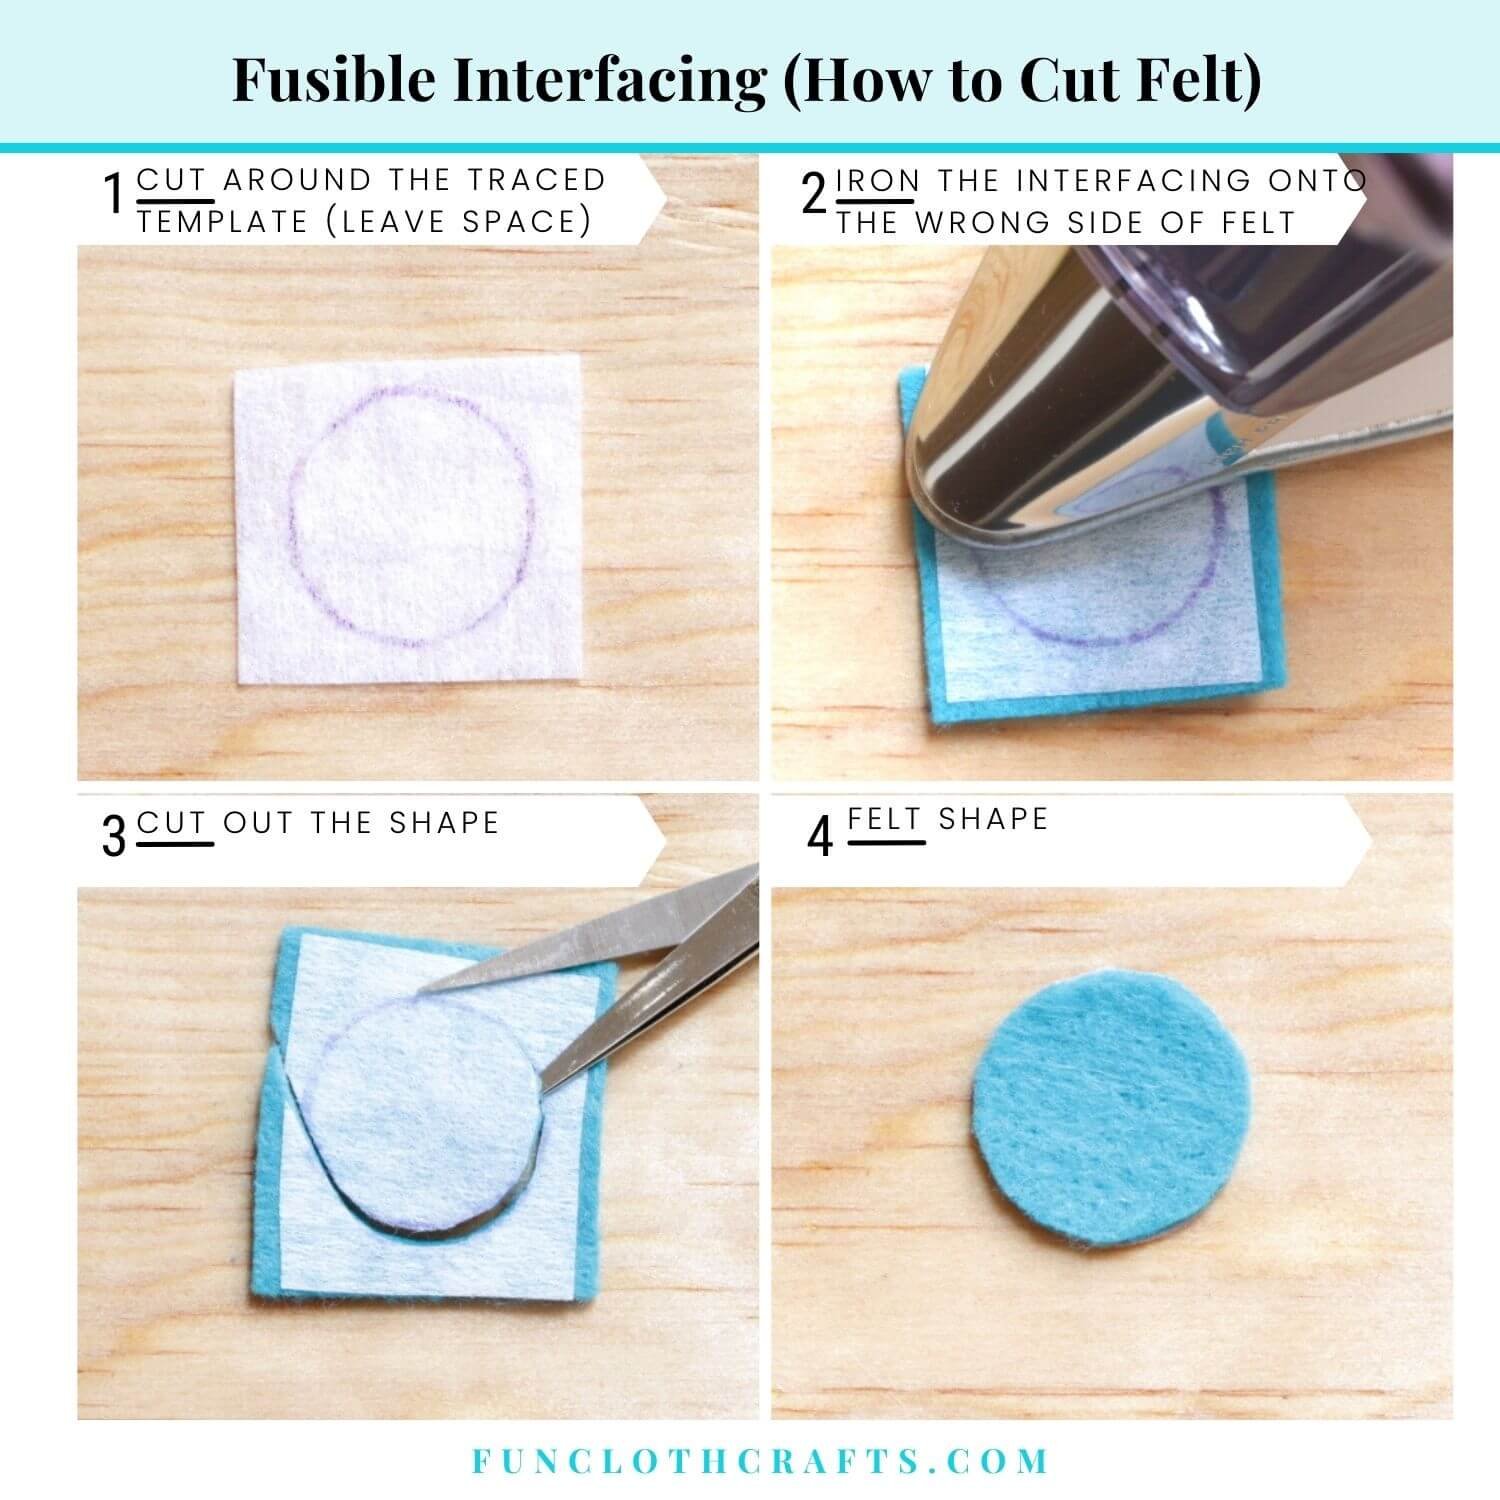
How to cut felt - fusible interfacing technique
Cut as you go technique to cut felt
A technique that I consider the fastest. It does not require any other tool than your scissors. It is ideal for pieces where precision is not critical, as there is a chance that the pattern might move slightly when cutting the felt shape. Practice is essential here, and I must admit I am still not there. And if you are a pro, you can cut felt without a template. I’ve seen crafters cutting tiny felt flowers without any template!
STEPS How to cut felt holding the paper template:
Print the pattern on paper
Cut around the traced pattern, leaving some space (not exactly on the lines)
Hold the template firmly onto the right-side of felt, and move your finger as needed
Cut the felt shape and remove the paper.
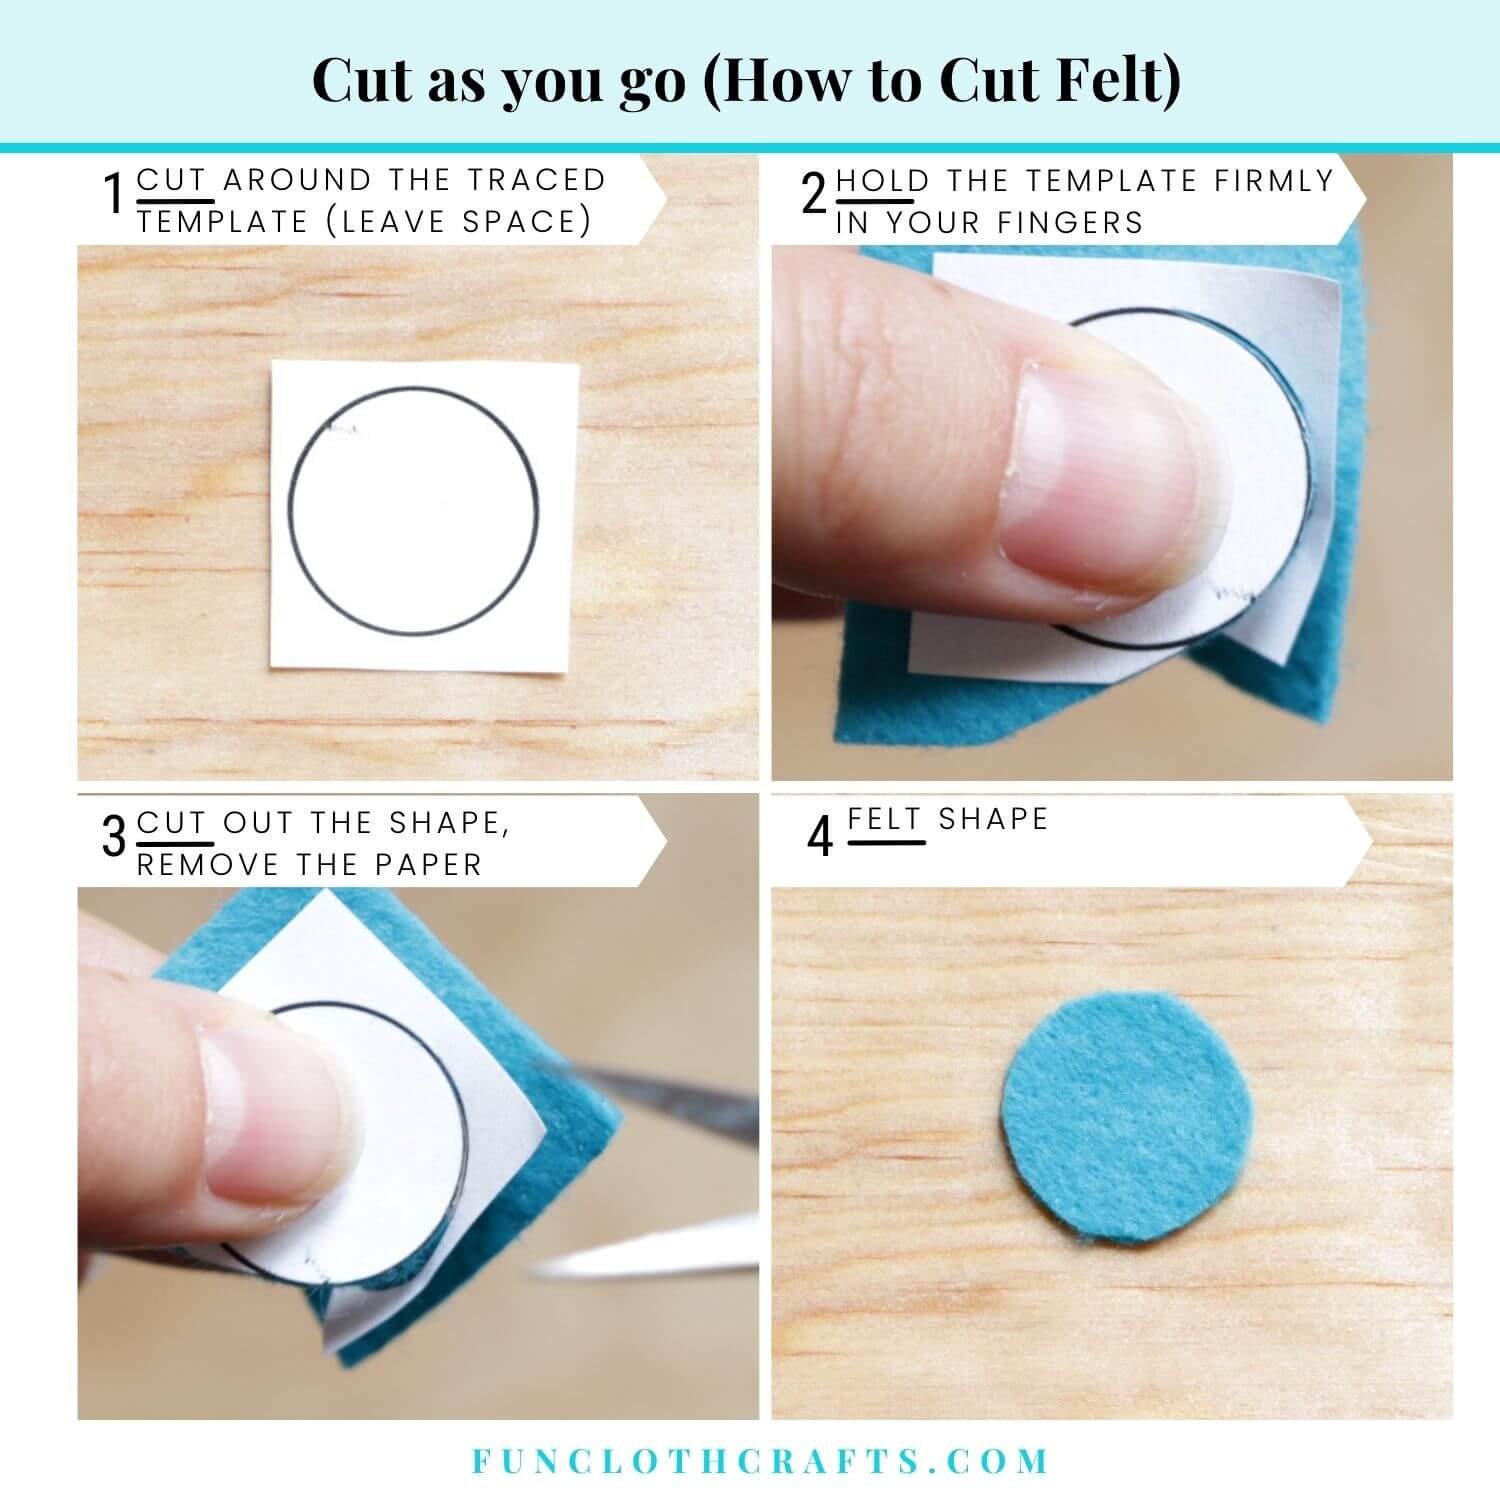
How to cut felt - Cut as you go technique
Conclusion Learn How to Cut Felt
These 6 Ways how to cut felt are my next tip for crafting with felt. Comparing the 6 cut felt circle shapes, I see a slight difference in the result. To conclude, there is no right or wrong method; each has its advantages and disadvantages. I think you should choose what works best for you and your felt craft project.
In my case, if I look for precision when cutting felt, I use the freezer paper technique. I will opt for the taping approach when I do not have freezer paper or don’t have time to use an iron. If I prefer the speed, I cut as I go. And if I want the felt shape to be more sturdy and not stretch out, I apply the fusible interfacing.

Thank you for reading! What are your thoughts? Let me know in comments if you find this article useful and share any tips of yours!
If you find this post useful, please take a moment and share it on social media.
Be sure to visit more on this website for free embroidery and sewing tutorials to help you out as you stitch my patterns. For free felt patterns visit my Freebies page.
Feel free to join my mailing list! You’ll receive updates on new patterns, the latest tips & tricks, and special promotions.
Let’s learn together!
XO, Anna