The Complete Guide on How to Do Running Stitch
This post contains affiliate links, which means I may earn a small commission at no additional cost to you if you click through the link and make a purchase. For more information, click here.
Running stitch is a simple to learn stitch, fast to sew, and gives a decorative look. It’s great for beginners and the perfect first stitch for kids. Follow this guide and learn how to do a running stitch, one of the basic stitches for hand sewing. You will use the running stitch to sew seams or to hand appliqué felt shapes. And you'll see—it's really easy! It's my personal favorite stitch.
TIP: The running stitch is also called the straight stitch. So, if you want to find more ideas, you can use the term straight stitch.

Table of Content
1. Running Stitch Definition
A running stitch is a foundational hand sewing stitch used in various sewing and hand embroidery projects. It is known for its simplicity and versatility, making it a popular choice for both beginners and experienced sewers. The running stitch is created by pushing the needle in and out of the fabric in a straight line, spacing the stitches evenly apart, and creating a dashed line. The running stitch can be used to join two pieces of fabric together, create decorative borders or patterns, and even add delicate embroidery details. It is commonly used in hand quilting, hemming, and mending projects. This makes it a versatile stitch. Due to its basic nature, the running stitch is easy to master and can be quickly executed, making it an essential stitch for anyone learning to sew. With practice, the running stitch can be used to create intricate designs and add personalized embellishments to various fabric items. If you want to create variations of the running stitch, you can sew different length of the stitches, for example, one short and one long stitch. In this post, I also show you how to stitch double running stitch and looped running stitch.
The running stitch definition:
The running stitch, or straight stitch, is a basic sewing stitch and the simplest embroidery stitch. In this stitch, the needle passes in and out of the fabric at regular intervals without overlapping. The stitch length may vary, but more thread is typically visible on the fabric's top than on the underside.
For reference, visit the running stitch definition from Textile Research Center.
2. What Is Running Stitch Used for?
Running stitch is used for various purposes, from embroidery to tailoring. It’s a simple stitch to sew basic seams, hems, and gathers.
In embroidery, the running stitch can serve as an outline stitch. If you embroider parallel rows of the running stitch, you make a fill.
As felt doesn’t fray, it’s an excellent stitch for seams. I sew most of the Fun Cloth Crafts felt patterns seams with running stitches. It’s fast and easy, therefore suitable for a beginner crafter.
Also, it’s a common first stitch for kids’ crafts.
Moreover, running stitch is used for appliqué making and hemming fabric sides.
The running stitch can also be used in quilting to sew the layers of fabric and batting together.

Running stitch graphic

Woodland Animal Finger Puppets - practice your running stitch hand sewing with this FREEBIE
1. Is Running Stitch the Same as a Basting Stitch?
No, running stitch and basting stitch are different. A running stitch is a permanent stitch used for various purposes in hand stitching, while a basting stitch is a temporary stitch used to hold fabric layers together temporarily before permanent stitching.
2. Can Running Stitch Be Used for Sashiko Embroidery
Yes, running stitch can be used for sashiko embroidery. Sashiko is a Japanese embroidery technique that often uses running stitch to create decorative patterns on fabric. The even stitches of running stitch enhance the geometric patterns traditionally associated with sashiko.
3. How to Do Running Stitch?
Learn how to do running stitch with this step-by-step photo illustration. Running stitch is easy to sew. It might be a bit irregular initially, but it gets better with practice. If you don’t like how the running stitch looks, don’t worry; remove the last stitch or previous stitches and repeat. Correcting your stitches when hand sewing with a running stitch is easy.
1. Running Stitch Length and Distance
The length of the running stitch can be anywhere from 1/16” to 1/2” (2 mm to 1 cm). The standard length of a running stitch, or a straight stitch, is between 1/8” to 1/4” (3 mm to 6 mm). Stitch distance (how far from each other the stitches are) should match the purpose of your project. In general, the distance will be slightly smaller than the actual stitch.
To ensure even running stitches, use a ruler or measuring tool to mark equal distances between each stitch. This will help you maintain consistent stitch lengths and create evenly spaced stitches.
For decorative embroidery, the running stitch spaces can vary in size, creating different patterns.
For felt kids' crafts, the running stitch length will be longer. The kids should aim at about 1/4 inch (6 mm) stitch length. Just be careful that the stitches and spaces aren’t too far from each other for softies (felt toys), as the stuffing might come out.
TIP: If the space between stitches is too long, the kids might do the second row of running stitches.
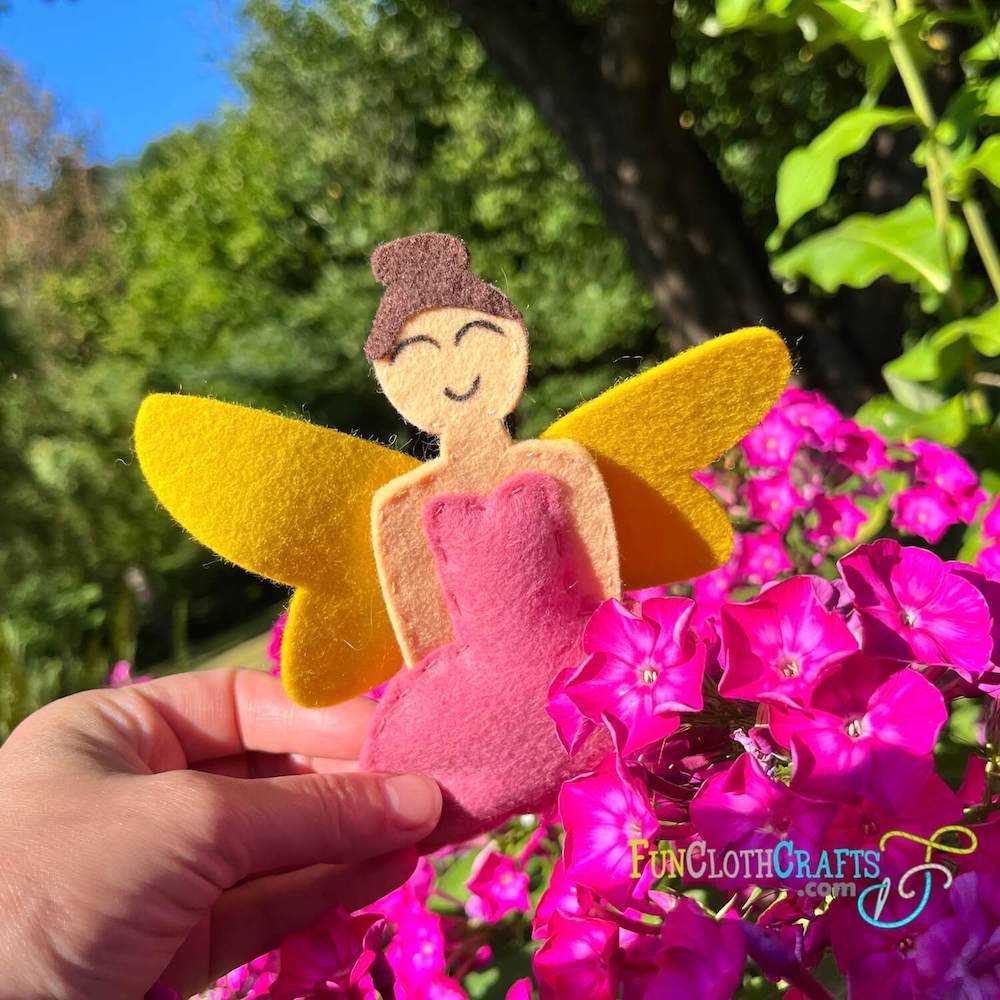
Felt Fairy Softie Kids’ Craft Sewed with Running Stitch - find free pattern in FREEBIES
2. The Direction of Stitching
Try, feel and find the most comfortable direction of stitching for you. I am stitching from right to left, which you can see in this embroidery tutorial. You can also stitch from left to right.
3. Running Stitch Hand Sewing Tutorial
If you are interested in reading the steps without practicing, move directly to the running stitch steps.
If you want to learn the running stitch with me, get two same-sized squares or rectangles of felt. Next, choose an embroidery needle and embroidery floss. I used three strands of the embroidery thread to make the sewing more visible, but you can work with one strand. You can also use a standard sharp needle and all-purpose thread. Finally, embroidery scissors or small scissors to trim your thread.
TIP: For information about working with felt, visit my sewing with felt post.
TIP: You can use a marker with disappearing ink to mark regularly the points where you want the needle to come up.
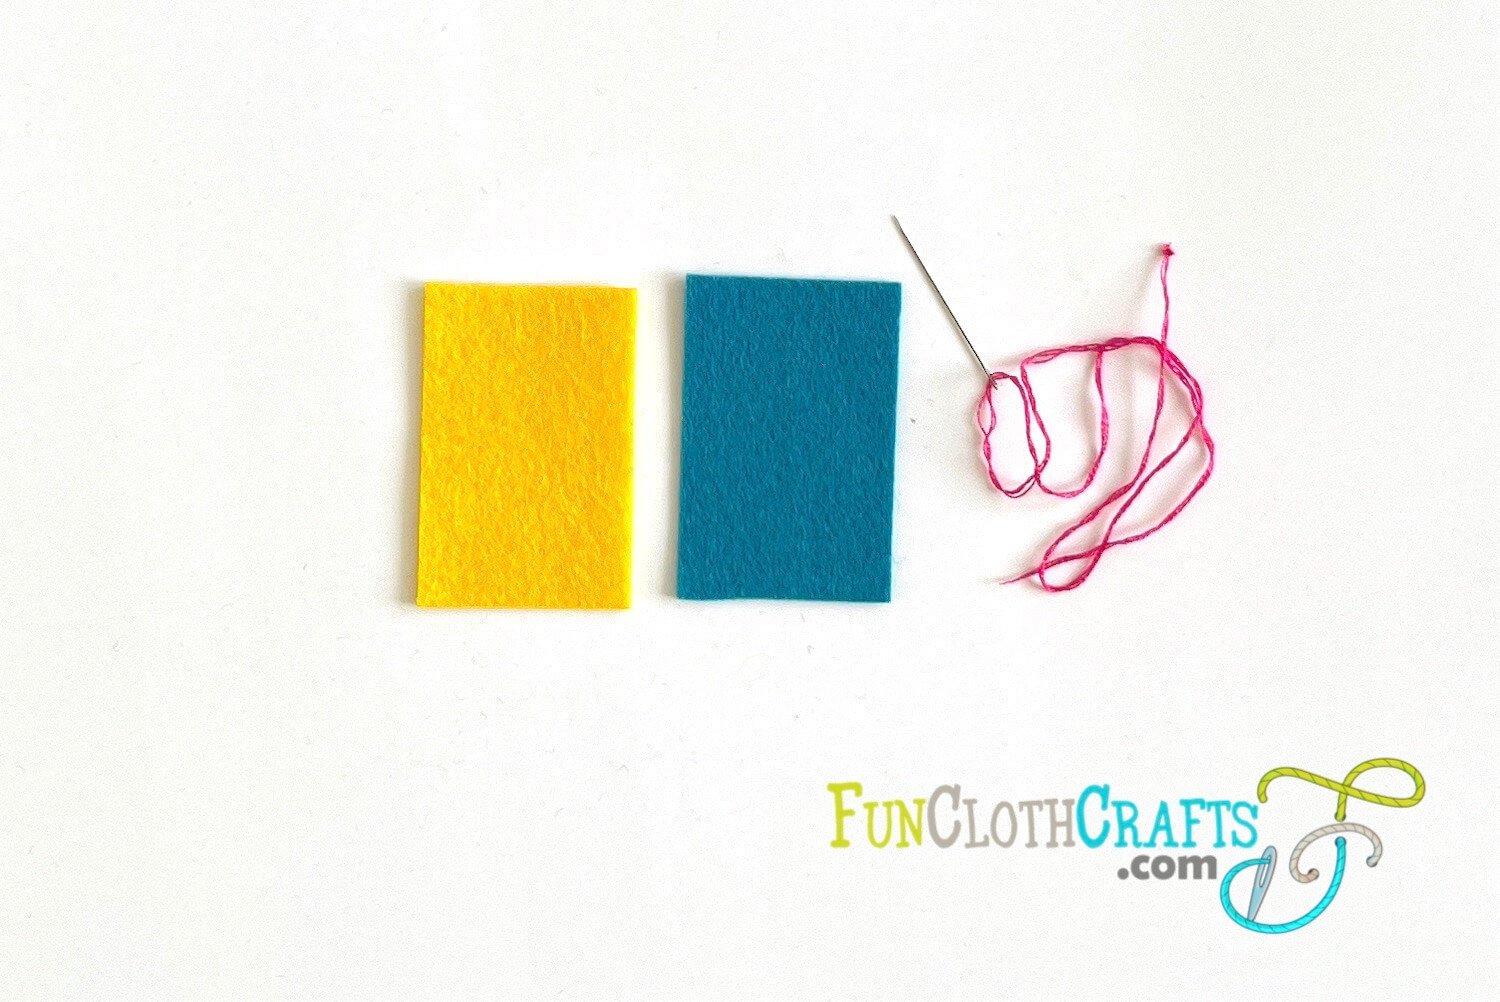
Running stitch by hand - tools to practice running stitch
4. Running Stitch Hand Sewing Step by Step
The following five detailed steps show you how to hand sew the running stitch.
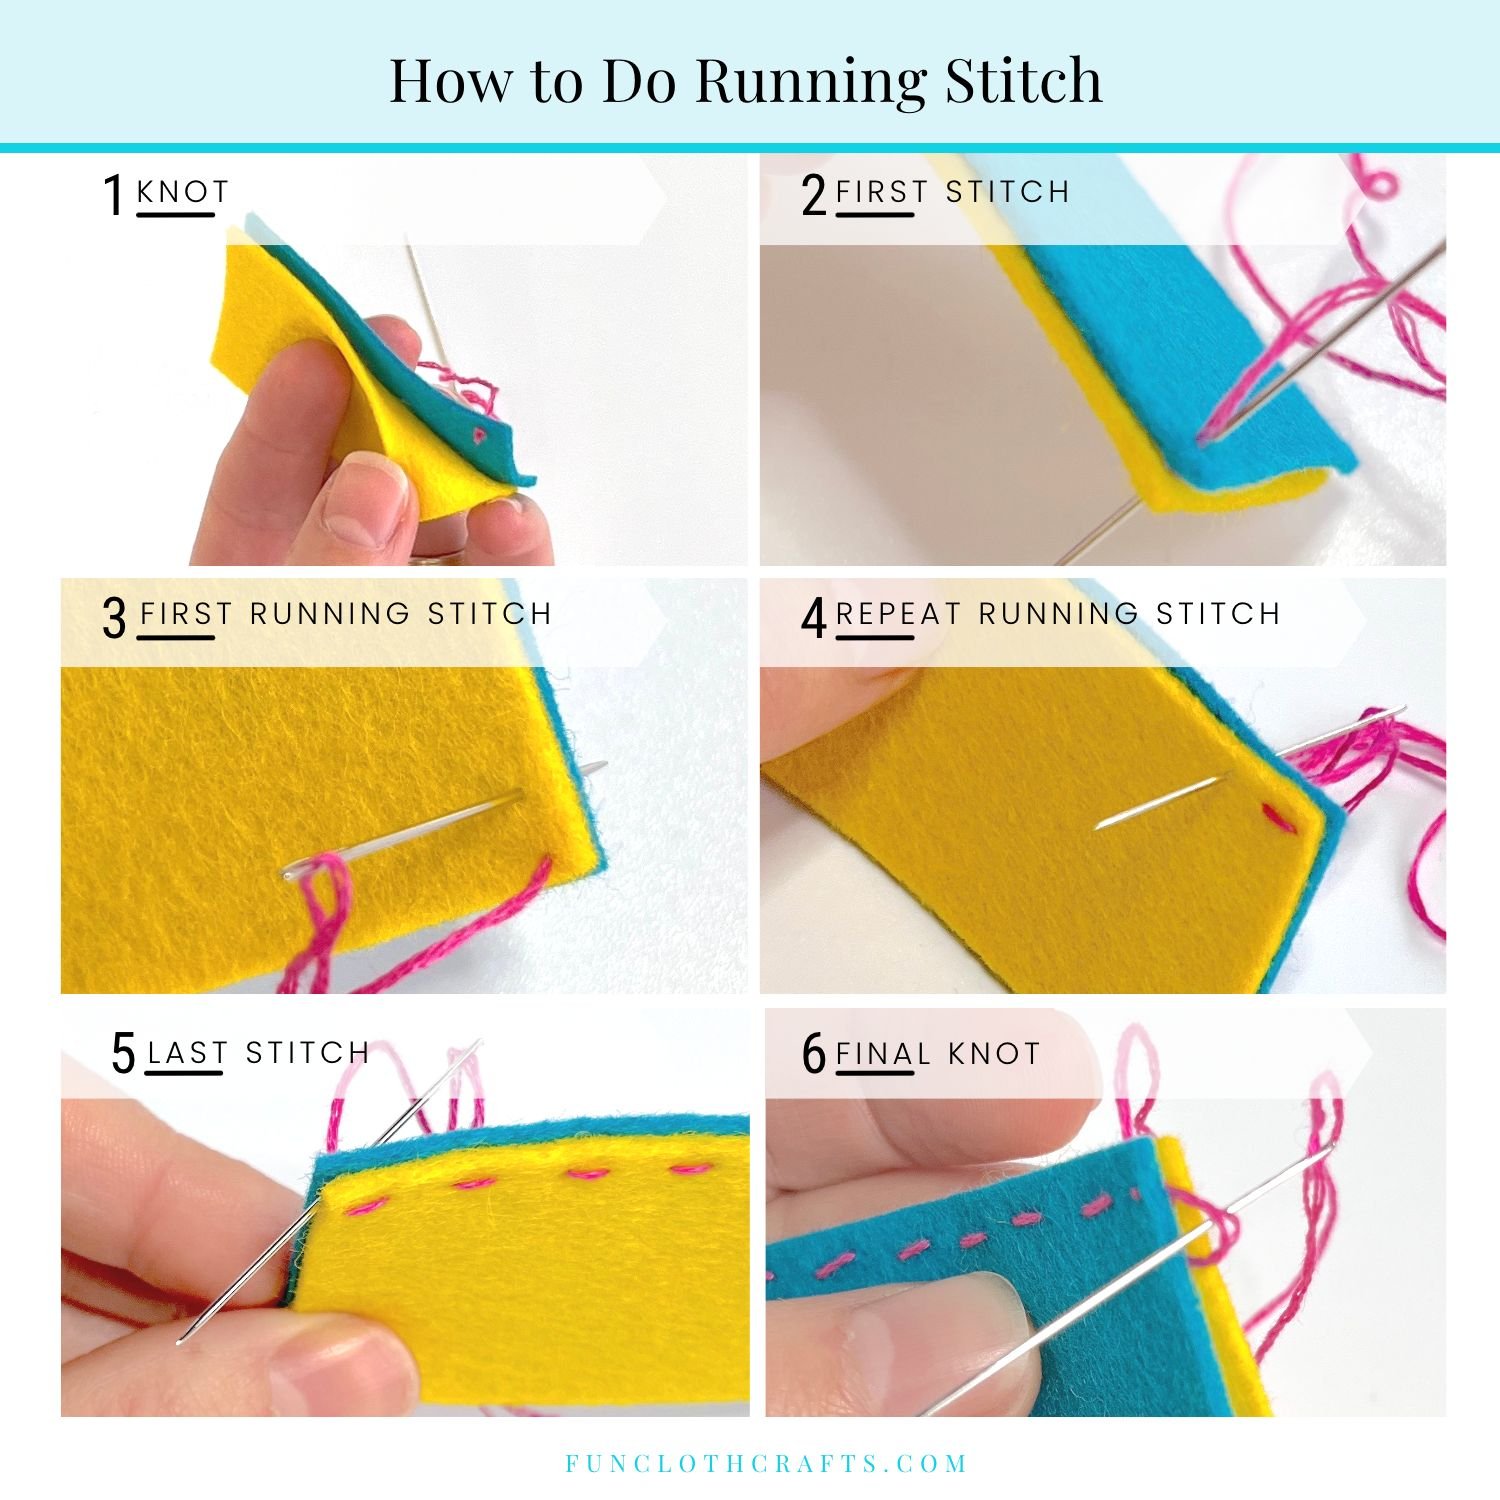
Knot
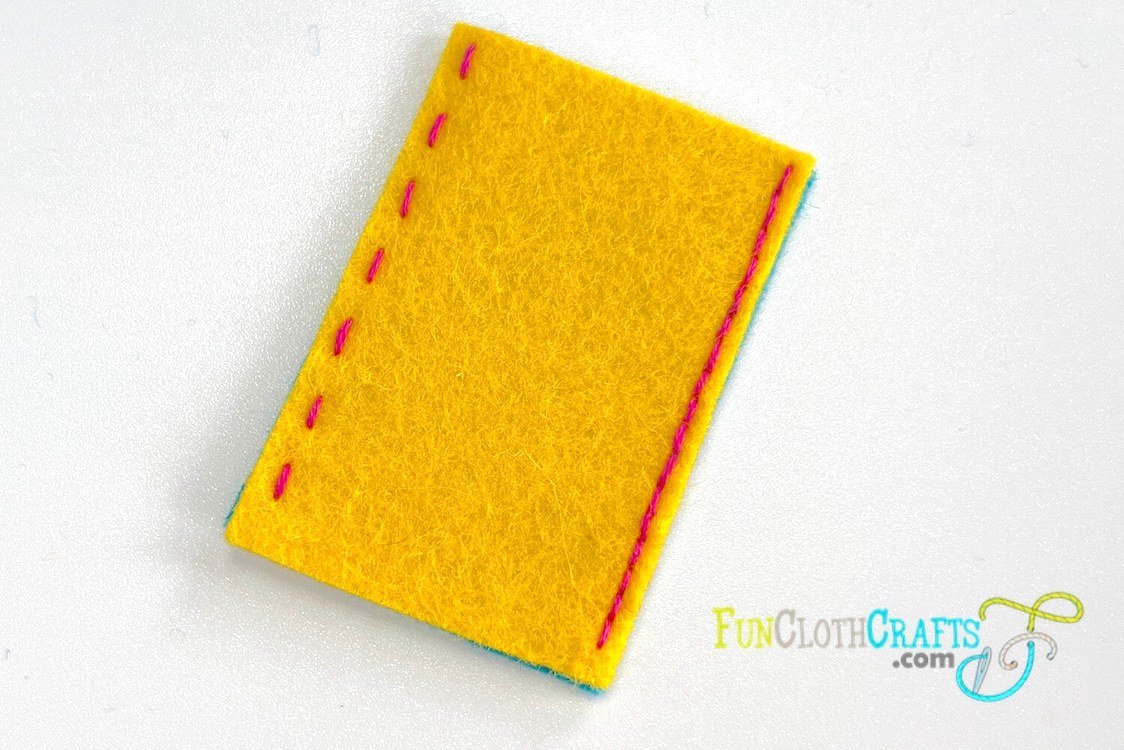
Line up the two pieces of fabric. Begin the running stitch by tying a knot at the end of your thread. Insert the needle between the two felt pieces. Then, bring the needle out through the back of your fabric. Your needle should now be on the backside of your craft. This way, the knot is hidden inside the two layers of your felt craft.
How to Start a Running Stitch
Make the first stitch by sewing a tiny stitch backward on the backside layer and poking the needle up through both layers of fabric. Now, the needle and thread are on the front side of the fabric. This way, you joined the two fabrics together and anchored the knot. This is the moment that you start sewing the running stitch. If you have only one layer of fabric or don’t mind having the knot on the reverse side of the felt, simply bring the needle from the back to the front, leaving the knot on the back side. Continue by making the first front stitch of your desired length. Push the needle through the fabric or fabrics to the back of the fabric.
How to Continue a Running Stitch
Come up through the fabric, leaving space between the stitches. Then push the needle down through the fabric, keeping the same length of the stitch as the previous stitch. Repeat this step until your project's end, or you run out of thread. Depending on the project, you might be able to sew through, making the whole stitch in one go (going down and up in one movement) and not in two steps. I prefer to do two steps as I get the equal look of the running stitch.
How to End a Running Stitch
Make the final stitch when you’ve sewn to the end of your sewing project. Come up from the backside, making a tiny stitch, but only through one layer of felt. Your thread is now in between the two layers of felt.
Final Knot
To make the final knot, you may need to separate the two fabrics a little to see the backs of the stitches you made. Make a loop around the inner seam and create a knot (I go twice around to make the knot). Before cutting the thread, run the needle through one layer of felt to the outside. You can now cut your thread on the outside. This leaves a tail, making the knot more secure. If you work with one layer of fabric only, place the needle under the nearest stitch and tight until a loop appears. Pass the needle through the loop and pull the thread to tighten the knot. Repeat once again to secure the knot. Another way is by making a small stitch (loop) and passing the needle through the loop to tighten the knot. Repeat once again.
Running stitch infographics
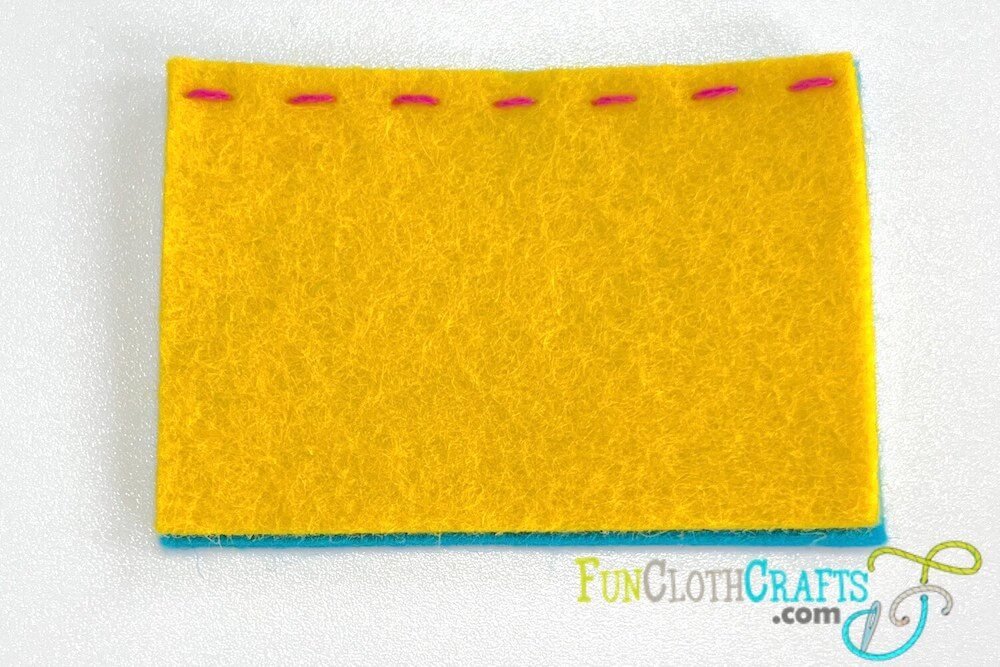
Running stitch hand sewing
4. Double Running Stitch
Double running stitch allows you to add different colors to your embroidery line, making your embroidery more colorful and fancy. It’s also known as Holbein stitch, and it's a decorative stitch.
Mastering the double running stitch is simpler than it may seem. It starts with a basic line of running stitch, which you then use as a guide for a second line. By filling in the empty spaces between the existing stitches, you effortlessly create a continuous, straight line, showcasing your embroidery skills.
Steps of double running stitch:
Start with the running stitch line. Then, continue with a second line. Bring the needle up at the end of the first running stitch and go down at the beginning of the second stitch. Come up at the end of the second stitch. Continue with the steps until the second line is complete. This creates the double running stitch in a solid line.

Double running stitch
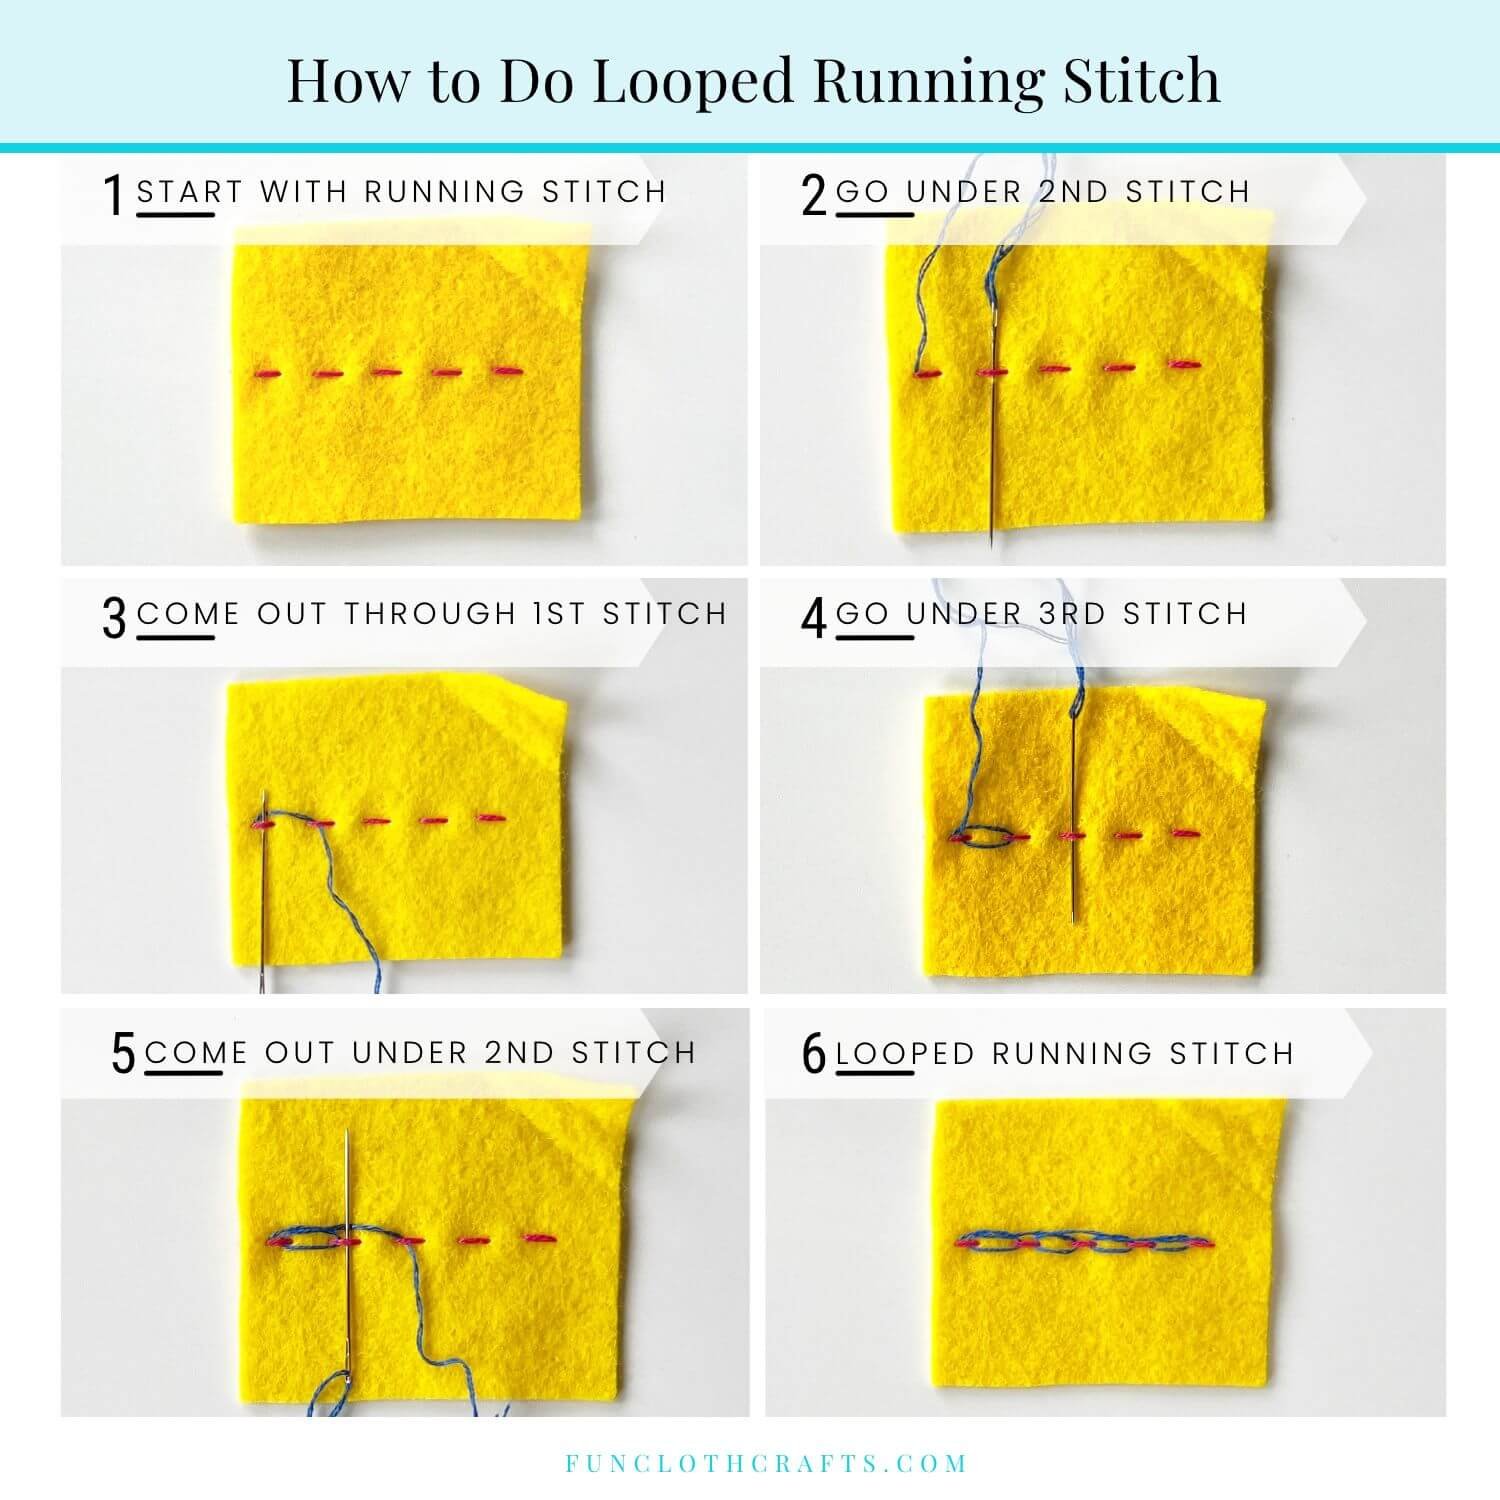
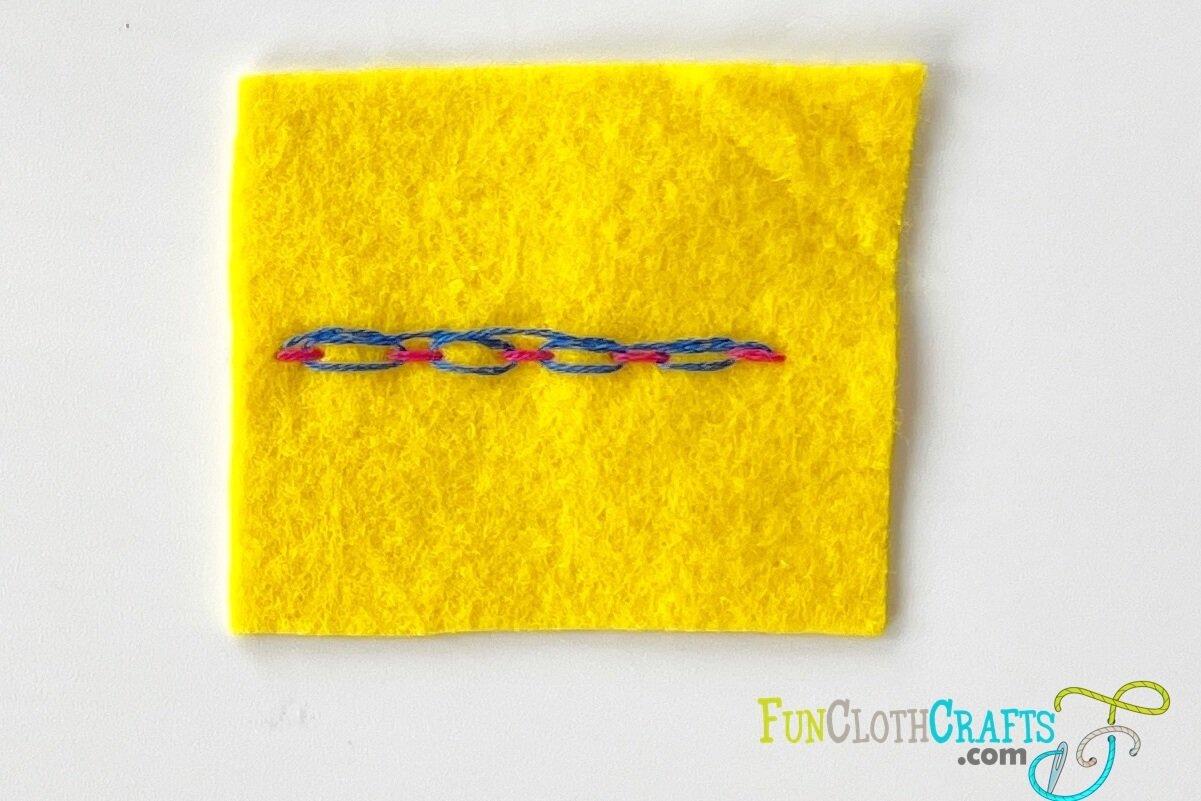
5. Looped Running Stitch
Looped running stitch is a variety of running stitch. It's one of decorative stitches.
Start by sewing the running stitch. Then, add loops in the running stitch using the same or another thread. You start the loops by coming up close to the first running stitch (at the beginning of the stitch). Continue by passing the needle under the second running stitch and returning under the first stitch. In the next step, pass the needle through the third stitch and return below the second stitch. This way, you carry on with the loops until all the running stitches are looped.
6. Felt Appliqué with Running Stitch
Appliqué decorates a piece of fabric with another smaller piece to form designs. The meaning of appliqué comes from the French appliquer, which means “to put on.”
In felt craft projects, you can appliqué with running stitch. This is possible as the edges of felt don’t fray. Simply follow the running stitch steps, and appliqué felt to fabric or felt to felt.
For the unicorn softie in the picture below, the eye and ear are appliqued with running stitch.

Unicorn Softie with Running Stitch Appliqué - make yours with my free pattern
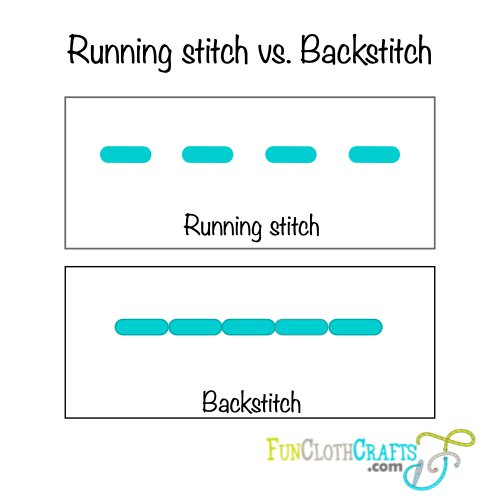
7. Running Stitch vs. Backstitch
The running stitch and the backstitch are basic hand embroidery stitches.
The running stitch is a simple up-and-down hand sewing stitch. The backstitch is similar to the running stitch, but you go back from the direction of the sewing line. There are no gaps in the fabric between stitches.
Running stitch vs. Backstitch diagram
Running stitch vs. Backstitch:
backstitch is stronger than running stitch as it overlaps on the backside
running stitch is faster to sew
running stitch has spaces, while backstitch makes a straight line
both stitches are easy to learn
Running stitch is often used for seams and applique in felt crafts. It's easy to learn and fast to sew. In comparison, the backstitch forms a solid line. Therefore, it's used to make an outline or add a decorative line. Frequently, letters are embroidered with the backstitch. I hand-sew face details, such as a mouth, with the backstitch.
The felt Fuzzy mouse free pattern uses the backstitch for whiskers and eyelashes and the running stitch for eyes and ears appliqué and seams. As you can see in the picture, it's easy to do a curved line with the running stitch.
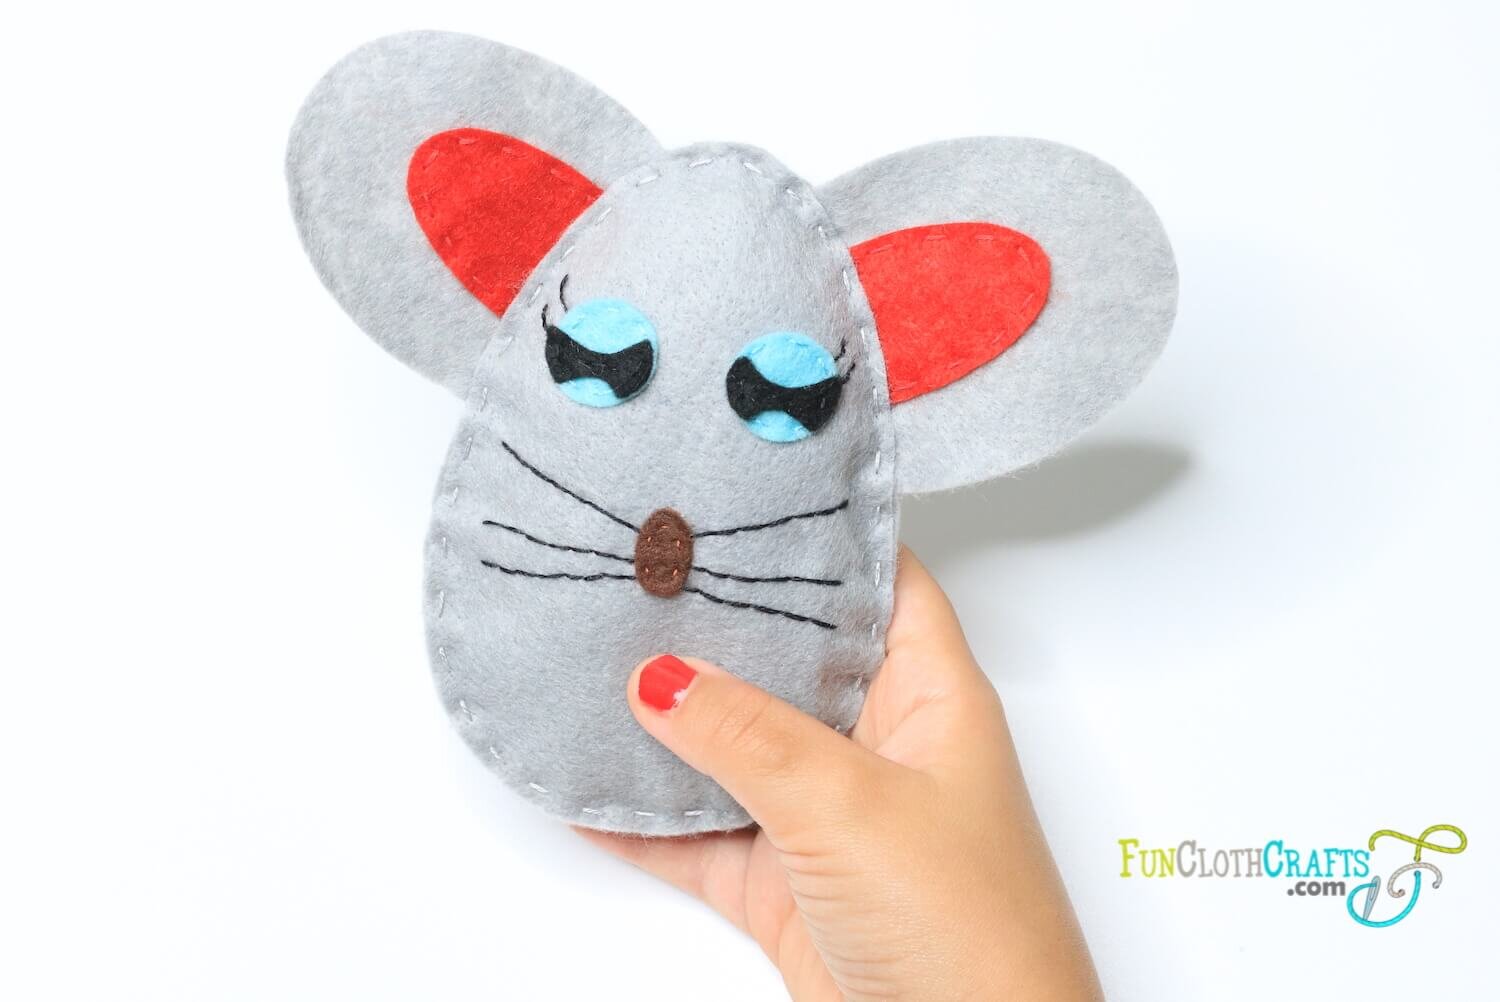
The felt mouse softie embroidered with running stitch and backstitch
Running stitch vs. Backstitch
8. Running Stitch vs. Whip Stitch
Both running stitch and whip stitch are basic embroidery stitches that help sew seams. If you want a decorative look, choose the running stitch. However, if it's important that the stitch almost disappears, sew with the whip stitch. For a beginner felt craft project or for kids' sewing, I would also opt for the running stitch.
Note that the running stitch can only join two fabrics that do not fray.
Running stitch is popular among felt crafters for felt applique. The whipstitch will be your choice for applique if you prefer that the stitches aren't too visible.
If you want to learn the whip stitch secrets, visit the how to whip stitch guide.

Running stitch vs. Whip stitch:
running stitch is simpler and faster than whip stitch
whip stitch creates a flat seam and may be almost invisible when using matching thread; on the other hand, running stitch makes a decorative seam
whip stitch prevents the fabric from unraveling, while running stitch doesn't
running stitch is easy to correct

Running stitch vs Whip stitch
9. To Wrap Up
How was your first running stitch hand sewing? Did you find it simple and fast? If you're eager to continue practicing, I have lovely tutorials in freebie felt craft patterns for you to choose from. The running stitch is a versatile technique that finds numerous applications in felt crafts and embroidery patterns. It's not just for sewing seams and joining fabric pieces together, but also for creating appliqué. And that's not all-it can be used as a decorative stitch and pattern darning, adding a unique touch to your creations.
Thank you for reading! What are your thoughts? Let me know if you find this article useful, and share any tips you have! Sharing the post on social media will help a ton.
Enjoy the felt crafting time :)
Feel free to join my mailing list! You’ll receive updates on new patterns, the latest sewing tips and tricks, and special promotions.
Let’s learn together!
XO, Anna